… as well as how to use your new route on the gaia gps phone app

Using caltopo.com, I made a route, including a gps track and paper maps, for my upcoming one-thousand mile traverse of the Brooks Range in Alaska. The route is entirely cross country, and follows no established roads or trails. Making this route was not as hard or as intimidating as I initially thought it would be. You can make your own route too!
First, ask yourself: where do you want to walk? What will be in the way? I won’t tell you, here, how to know where to put the line itself, on which you will walk- where you’ll put the actual line depends on what sort of route you’re making through which kind of terrain and what sort of experience you’re trying to have. Before making your own route, you should be able to look at a bunch of topo lines and “see” the landscape pretty well. You should be able to tell what is up and what is down, what a pass looks like, how steep a hillside is, etc. A good understanding of how to read and interpret a topo map is necessary before making your own route. That being said, once you have a good understanding of topo maps, both google earth and the various additional background layers in caltopo will assist you further in your visualization, as you attempt to imagine how to get from point A to point B over the convoluted surface of the earth.
If you need more experience navigating with topo maps in order to learn to read them better, I suggest hiking some routes that others have made which include cross-country (by that I mean there is no trail or road to follow) travel and which require a person to read the terrain with paper maps and/or their gaia gps app. Some good routes for this would be the Grand Enchantment Trail, the Lowest to Highest Route, the Hayduke Route, the Wind River High Route, the Sierra High Route, and the Kings Canyon High Basin Route. (There are others but these are the first ones that come to mind.) All of the above routes are very difficult, sort of grad-school level in the long distance hiking world, and they require the very developed niche skillset that comes with a good deal of long distance hiking experience. Before hiking one of these routes, I’d recommend starting with an established trail (where there is a consistent path on the ground to follow) such as the PCT, AT, Tahoe Rim Trail, Long Trail, Colorado Trail, and others. (The CDT is a mix of trail/road and cross-country, so can be a good in-between of these two types of trails.)
Assuming you have the experience to judge for yourself where to put your route, here is how I made my maps for the Brooks Range Traverse.
-Go to caltopo.com. Buy a membership, so that you can save your maps. I bought the most basic membership, which allows me to make a PDF of 15 map pages at once. (My Brooks Range Traverse requires more than 15 pages of maps, so I made multiple PDFs of 15 pages each. Seems chill.)
-Scroll/zoom/search in caltopo until you reach the starting point of your route.
-Choose your layers: this will be your map background. I like the “7.5′ Topo Maps” feature that is offered to the left, per the arrow in the photo below.
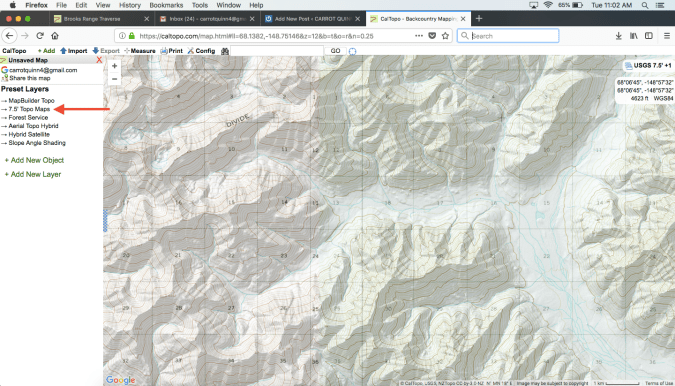
-This preset layer (1) is a blend of USGS 7.5′ maps and shaded relief at 25% (3 and 4), which you can see in the drop down box on the right (2). I like this combo because it has topo lines and just enough shaded relief to help with route planning. This drop down box is also where you can make your own custom layers by blending different things at different percentages. Play around with it, it’s fun.

-Now click the green “Add” button and then “Add Marker”.

-This will put a smol red dot on your map (1) and open a box in the lower right hand corner where you can label your dot (2) as well as change its color (3). While this box is open, hover over your dot until the cursor becomes a hand and drag the dot around to where you want it to be. You can also enter coordinates for the dot in the box if you want to place it that way.

-Click “Add” again (1) and choose “Add line”. This will open a box where you can label the line and change its color. While this box is open, Shift+Click to freehand draw your line and double click when your line is finished (2). To add to or edit your line, click on it to open the box below (3). In this box, click “extend” and then Shift+Click to continue drawing your line where you left off, double clicking when you’re finished, or “split” (which breaks your line into two at the spot in the line where you clicked) to separate a section (if you want to delete it or redo it). You can also click “join” (to join it with another line), or “profile” to seen an elevation profile of your line. A mileage for your line will be listed in this box as well, but you’re experienced enough to know that this does not reflect actual on-the-ground mileage. When I’m attempting to estimate on-the-ground mileage I make a separate line and zig zag it a bit in an extremely precise (lol) way, and this tends to be closer to what the actual mileage ends up being.

-Once you’ve finished your track and added all the waypoints that you want, it’s time to download your route so that you can use it in the gaia gps app, and look at it in google earth! Click “export” and then “Download KML File” (1). Save the file to your computer. Now you can open it in google earth on your computer, which is kind of incredible. Also, email it to yourself for the gaia app (I’ll explain that part in a minute).

-You can also generate a PDF of your map(s), for printing! Click “Print” and then “Print to PDF or JPG”.

-This will open a new browser window and place a red box over your route. Here you will select your page size (1) and your scale (2). I did 1:63360, or one inch = one mile, for the BRT. This is pretty good, but a more zoomed in map would be even more useful for navigating complex topography, especially when it comes to high passes and the like. I used this scale because we are using the gaia app as well as our paper maps, and are able to zoom in further on gaia.
-The red box that is automatically placed on the map can be either portrait or landscape (3). Here I chose landscape, to best fit the shape of the line. Make sure to include enough space on either side of your track to include whatever additional topography you might need to navigate, as well as whatever bail out routes and alternates you might need.
-Click the red dot in the middle of the box (4) to move the box around.
-Once you’ve placed the first box, click +Add Page (5) to generate another box. Position this second box over the next section of your line. I like to overlap my pages a bit, to make them more user friendly IRL, and in case anything important gets cut off.
-Once you’ve placed all your boxes, click “Generate PDF” (6).

-This will open a third browser window… with a beautiful PDF of your map!! If your map is multiple pages, there will be an overview page as well. Click the download button in the upper right corner of the window, and save the file to your computer. Now you can print your map(s)!

-On my Brooks Range Traverse, we’ll be using the gaia gps app as well as paper maps. To be honest, I (almost) always carry paper maps, but I mostly navigate with gaia. It’s just really user friendly and reliable (once you figure out how to work around the bugs) and I love being able to zoom in really far and save large areas of background maps. Here’s how to use your new route in the gaia app.
-First, download the gaia gps app to your phone, and buy the paid version. Open the app, and click the layers menu (1) in the upper right hand corner. Select “USGS Topo” (2). These are much better for navigating that the gaia topo, which is the default when you first install the app.

-Remember when you emailed the KML file of your route to yourself? Open that email on your phone, and click on the attachment. This should automatically open the file in gaia, and import the track and all the waypoints. Now you’ll have a window that looks something like this:

-Now it’s time to download the background maps to your phone, so that you can use gaia when you’re in airplane mode. The whole point of gaia is to be able to use the app in airplane mode, because on trail you either won’t have reception or you’ll be saving your battery (or both). If you try to use gaia without reception and you haven’t downloaded the background maps, you’ll just see a blurry map. Even without reception (or while in airplane mode), the GPS in your phone still works incredible well, so as long as you have your background maps downloaded gaia will be able to accurately (unless you’re in a canyon or similar feature) place you on your map while you’re in the wilderness.
-Make sure you have enough space on your phone to store your background maps. I use a memory card on my phone, and go into gaia’s settings to make sure the maps are stored on the card, as opposed to the phone’s internal storage. If you’re just downloading a small map, it won’t be as much of an issue.
-To save your maps, pinch the screen to zoom in and out until you have your entire route or area you want to save in the screen. Click the “+” button (1) and select “Download Map” (2).

-A red box will appear. Use the circles at the corners of this box (1) to change its size to your liking. Gaia lets you download a certain number of tiles at a time- the number of tiles at the top of the screen will turn red when you go over this limit. If you want to download a larger area than the allotted amount, you can download the map in chunks. (I downloaded the BRT maps in seven chunks.)
-Click “Save” (2).

-Your file will begin downloading. The maps can take hours to download, depending on how big they are, or sometimes overnight. Once the maps are done downloading but before using gaia for your route, put your phone in airplane mode and zoom in pretty far for your entire route, to make sure all the tiles downloaded. If not, erase that map and download it again.
Congrats! You are now the master of your own destiny. Go forth and walk upon the convoluted surface of the earth!!!
We’ve raised $4,400 so far for Defend the Sacred AK! This is so awesome!! As a white outdoorsperson who is deeply invested in the Alaskan wilderness and who is connected to networks of other white outdoorspeople via my online platform, helping to shift resources to an Alaskan Native-led organization that is fighting to protect their sacred lands from current threats feels like one of the most useful things I can do. Thanks to everyone who’s contributed so far, and here’s the fundraiser if you haven’t seen it yet:
Alaska Traverse for Defend the Sacred AK

If you’d like to receive a notification via email every time I post here, scroll to the bottom of this page and enter your info in the box. No spam ever. Yay!

You must be logged in to post a comment.